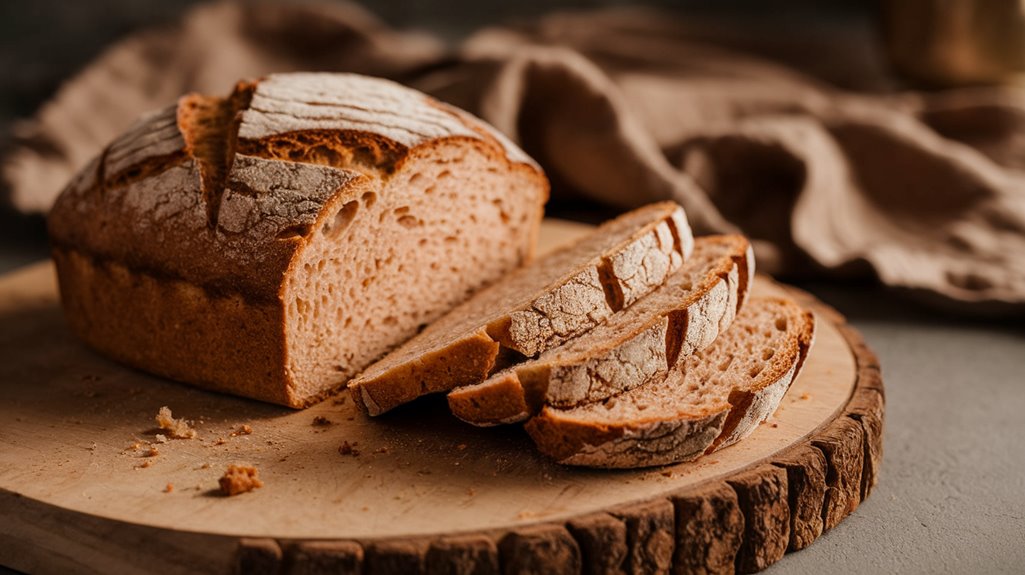
 No Knead Bread 1")
With just one hour of hands-on time, you can create a delicious, tender, and crusty loaf of no-knead bread that rivals those from your favorite bakery. You’ll mix simple ingredients, let the dough rise for 12-24 hours, and then shape and bake it to perfection. You can customize the recipe to suit your taste preferences and add unique flavors along the way. Want to learn the secrets to achieving the perfect crust and crumb?
History
Since ancient times, humans have been fascinated by the process of transforming simple ingredients like flour, water, and salt into a delicious, crusty loaf of bread. You’re about to tap into this ancient roots of bread-making, which have been refined over time. The concept of slow rise, where yeast ferments the dough over a longer period, has been a game-changer. This technique allows for a deeper flavor and a more tender crumb, making the bread truly exceptional. As you set out on this no-knead bread journey, remember that you’re building on centuries of expertise and innovation. With each loaf, you’ll be transformed, and so will you.
Recipe
This no-knead bread recipe is a game-changer for anyone who wants to make homemade bread without the hassle of kneading. The slow rise process allows the dough to develop a complex flavor and tender crumb. With just a few simple ingredients, you can create a delicious loaf that’s perfect for sandwiches, toast, or serving alongside your favorite soups.
The best part about this recipe is that it’s incredibly flexible. You can let the dough rise for as little as 12 hours or as long as 24 hours, depending on your schedule. Plus, you can customize the recipe by adding in herbs, spices, or nuts to create a unique flavor profile.
Flexibility is key: rise for 12-24 hours and customize with herbs, spices, or nuts for a one-of-a-kind flavor.
- 1 1/2 cups warm water
- 2 teaspoons active dry yeast
- 3 1/2 cups all-purpose flour
- 1 teaspoon salt
To begin, combine the warm water and yeast in a large mixing bowl. Let the mixture sit for 5-10 minutes, or until the yeast is activated and foamy. Add in the flour, salt, and any remaining dry ingredients, mixing until the dough comes together in a shaggy ball. Cover the bowl with plastic wrap or a damp towel and let the dough rise in a warm, draft-free place.
After the rise, preheat your oven to 450°F (230°C). Gently place the dough onto a piece of parchment paper or a lightly floured pizza peel, if you have one. Score the bread with a sharp knife, making 2-3 diagonal cuts on the surface. Place the parchment paper or pizza peel into the oven, baking for 25-30 minutes, or until the bread is golden brown and sounds hollow when tapped on the bottom.
Remember to handle the dough gently to avoid developing the gluten, which can lead to a dense loaf. Also, be patient and don’t rush the rise process – the longer the dough rises, the more complex the flavor will be.
The Full Ingredient List
 No Knead Bread 2")
You’ll need just four simple ingredients to get started with the no-knead bread recipe. These basic components will combine to create a delicious loaf with a perfect balance of crumb and crust.
- High-quality flour: Using a high-protein flour will result in a better gluten structure, giving your bread a more tender crumb and a more rustic crust. Look for bread flour or all-purpose flour with a high protein content.
- Water: The right amount of water is vital for creating a dough that’s easy to work with and produces a well-balanced loaf. The ideal ingredient ratio is 1:1 flour to water.
- Salt and yeast: These two ingredients will enhance the flavor and texture of your bread. Use a small amount of salt to bring out the natural flavors, and a pinch of yeast to help the dough rise.
Cooking Steps
You’re now ready to move on to the cooking steps, where you’ll combine ingredients in a specific order. You’ll start by mixing flour and yeast, then add salt and water, followed by folding in olive oil. Next, you’ll cover the dough with plastic wrap and let it sit overnight, allowing the magic to happen.
Step 1. Mix Flour and Yeast
 No Knead Bread 3")
Flour dusts the countertop as you prepare to combine them with yeast. You’re about to create the foundation of your no-knead bread. Take a deep breath, and grab your measuring cups and spoons.
| Ingredient | Quantity | Notes |
|---|---|---|
| Bread Flour | 3 1/2 cups | Use fresh yeast for better results |
| Yeast | 1/4 teaspoon | Fresh yeast is more potent than old yeast |
Add Salt and Water
 No Knead Bread 4")
With your flour and yeast mixture prepared, add 1 1/2 teaspoons of salt. This salt ratio is vital, as it helps control yeast growth and flavor development. Next, add 1 1/2 cups of water. Make sure the water quality is good, as chlorine or other impurities can affect yeast performance. Mix the ingredients until they form a shaggy dough. Don’t overmix – you’re not trying to develop gluten at this stage. The dough should still be slightly lumpy and rough. Now, you’ve successfully added salt and water to your no-knead bread mixture. You’re one step closer to baking a delicious, crusty loaf.
Step 3. Fold in Olive Oil
 No Knead Bread 5")
Now that your shaggy dough has formed, it’s time to incorporate olive oil to enhance the flavor and texture of your no-knead bread. Fold in 2-3 tablespoons of olive oil, taking care not to overmix. This step brings numerous olive oil benefits, including a richer flavor and tender crumb. Choose an oil with a mild flavor profile, as it won’t overpower the other flavors. You’ll notice how the dough starts to relax and become more pliable. As you fold, the oil will spread evenly, coating the dough and preparing it for the next steps. With the olive oil fully incorporated, you’re one step closer to baking a delicious, crusty no-knead bread.
Step 4. Cover With Plastic Wrap
 No Knead Bread 6")
You’ve successfully incorporated olive oil into your dough, giving it a tender crumb and richer aroma. Now, it’s time to cover your dough with plastic wrap. Grab a fresh wrap or a kitchen wrap from your pantry and stretch it over the bowl, making sure to cover the entire surface. This will prevent the dough from drying and forming a crust while it rests. Make sure the wrap is tightly sealed, but not too tight, as you want the dough to breathe a bit. With your dough covered, you’re one step closer to baking a delicious, crusty no-knead bread.
Step 5. Let Dough Rest Overnight
 No Knead Bread 7")
The dough needs time to develop its flavors and texture, so place the covered bowl in a cool, draft-free spot, like a pantry or cupboard. Let it rest overnight, allowing the slow rise benefits to work their magic. This step is vital, as it enables the gluten to relax, making the dough easier to shape in the morning. You’ll appreciate the morning prep ease, too – simply remove the dough from the bowl, shape it, and let it rise for a few hours before baking. With minimal effort, you’ll be rewarded with a delicious, crusty loaf that’s sure to impress.
Final Thoughts
As you emerge from the world of no-knead bread-making mastery, a sense of accomplishment settles in, like the gentle crust forming on your latest loaf. You’ve earned fresh perspectives on the hassle of traditional kneading, and sweet successes come with each delicious batch. You’ve discovered the secret to crusty, airy loaves that impress friends and family. Your confidence grows with each new recipe, and the joy of sharing homemade bread brings people together. You’ve accessed the simplicity of no-knead bread, and it’s a skill that will stay with you forever. Now, go forth and bake!